

Custom Button Implementation
Implement a custom TBYB button experience.
For any variety of reasons, a custom button implementation may be required to implement TryNow.
Heads up!A custom implementation will impact your access to TryNow features. Custom implementations are not recommended as a first option and considered required for special cases. If you are uncertain about your implementation, please contact TryNow support.
Impacts
When you opt for a custom button implementation, you will have much less ability to track shopper journeys.
Set Up
The main piece that needs to be included for a two button experience is the selling plan ID.
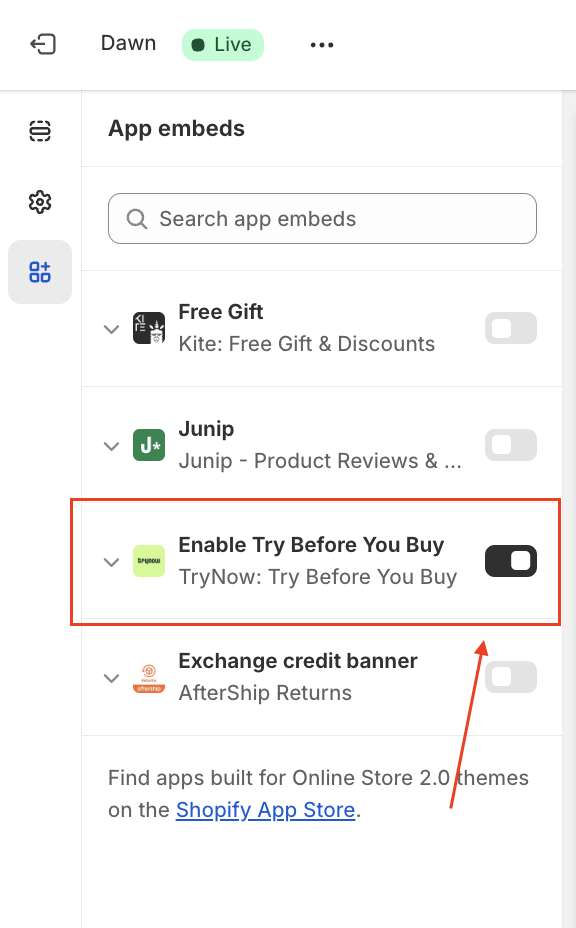
1. Enable Try Before You Buy
In order to access the selling plan ID, which you will need to enable the Try Before You Buy App Embed for your Shopify Store.
Alternately, you could paste this script into your theme code and that will similarly grant you access to the window.trynow object:
<script data-trynow async src="https://components.trynow.net/shopify/1.7.0/trynow.min.js"></script>Once either of those two options are completed, you will have access to methods on the window.trynow object. To get the selling plan, copy/paste this into your liquid file:
<script>
	if (!window.trynow) return
	const sellingPlan = await window.trynow.getSellingPlanId()
	const sellingPlanID = parseInt(sellingPlan?.split('/')[4], 10)
</script>
You will now have the sellingPlanId saved as a constant.
2. Create your button
We recommend copying your existing Add to Cart button. Add this wherever you would like it rendered in your theme code. Below your Add to Cart button is recommended so it is clear to the shopper what the related action of the TryNow CTA button is.
Usually the Add to Cart button is in a product template as defined in the product.json file, but it can also be in an add-to-cart form template, or a theme.js file.
Additionally, if you have multiple product templates, you will have to replicate your work in any template for which you'd like the TryNow CTA button to appear.
HintAdd to Cart buttons can be rendered in JavaScript or in Liquid files. It should not matter whether it is rendered by JavaScript or Liquid, so long as it is copied and emulates the behavior of the Add to Cart button.
Here is a generic example of an Add to Cart button from a Dawn theme:
<button
   id="ProductSubmitButton-{{ section_id }}"
   type="submit"
   name="add"
   class="product-form__submit button button--full-width {% if show_dynamic_checkout %}button--secondary{% else %}button--primary{% endif %}"
>
  Add to Cart
</button>
And the copied TryNow button with a TryNow-Product class added:
<button
   id="ProductSubmitButton-{{ section_id }}"
   type="submit"
   name="add"
   class="TryNow-Product product-form__submit button button--full-width {% if show_dynamic_checkout %}button--secondary{% else %}button--primary{% endif %}"
>
  Try Before You Buy
</button>
3. Add the submit behavior
On submit, the selling plan found in the meta tag which was acquired in step one must be associated with the item on click. This could be added wherever the add to cart form exists in the Liquid code in a <script> tag, or can be written as a new function and used as an onClick event in JavaScript.
The TryNow SDK exposes a method called addToCartClicked which can be called to ensure that button-click analytics remain in sync.
async function submitTryNow(item) {
  let formData = {
    items: [
      {
        id: item.id,
        quantity: 1,
        selling_plan: sellingPlanId,
      },
    ],
  };

  fetch(window.Shopify.routes.root + "cart/add.js", {
    method: "POST",
    headers: {
      "Content-Type": "application/json",
    },
    body: JSON.stringify(formData),
  })
    .then(async (response) => {
      await window.trynow.addToCartClicked();

      return response.json();
    })
    .catch((error) => {
      console.error("Error adding TryNow item to cart:", error);
    });
}
Heads up!Form submit behavior varies greatly from theme to theme. You will need to locate where the form submit behavior is happening and use the TryNow selling plan based on whether or not the button with the TryNow class on it is being clicked.
4. Add Button Visibility Rules Criteria
A custom button on its own cannot communicate with TryNow's Rules Engine. Therefore none of the rules defined in the Rules Engine will apply to the custom button. However, you can use the TryNow exposed method calculateProductVisibilityFromTags() to sync your custom button with the Rules Engine.
In the Liquid or JavaScript file where you added the button, add this custom JavaScript inside a <script> tag:
document.addEventListener('DOMContentLoaded', async function() {
  const productTags = ({{ product.tags | json }}).map(tag => tag.toLowerCase());
  const calculateVisibility = window.trynow.product.calculateProductVisibilityFromTags;
  const ctaButton = document.querySelector('#trynow-cta-button');
  const isVisible = await calculateVisibility(productTags);

  if (!isVisible) {
    ctaButton.style.display = 'none';
  }
});
This gets the product tags and passes them to calculateProductVisibilityFromTags() which compares them to the Rules Engine and returns false when the product is being excluded by some rule.
Learn more about our product methods here.
Updated 8 months ago