Collections
TryNow uses a combination of rules to determine whether a product is eligible for Try Before You Buy.
What are collections?
Collections are groups of products with like attributes— for example, product tags— that help direct a shopper to a specific category of product.
Shopify allows for the creation of automated collections based on matched tags, but not exclusion. There are two options for implementation— a manual Liquid implementation, or utilization of the TryNow Product Processor, which will automatically manage adding the correct selling plan and product tag (and therefore TryNow button visibility) for you.
Prerequisites
Button Visibility Rules should be configured in Merchant Portal.
Implementation
There are two methods with which you can implement a TryNow collection.
Product Processor (automatic)
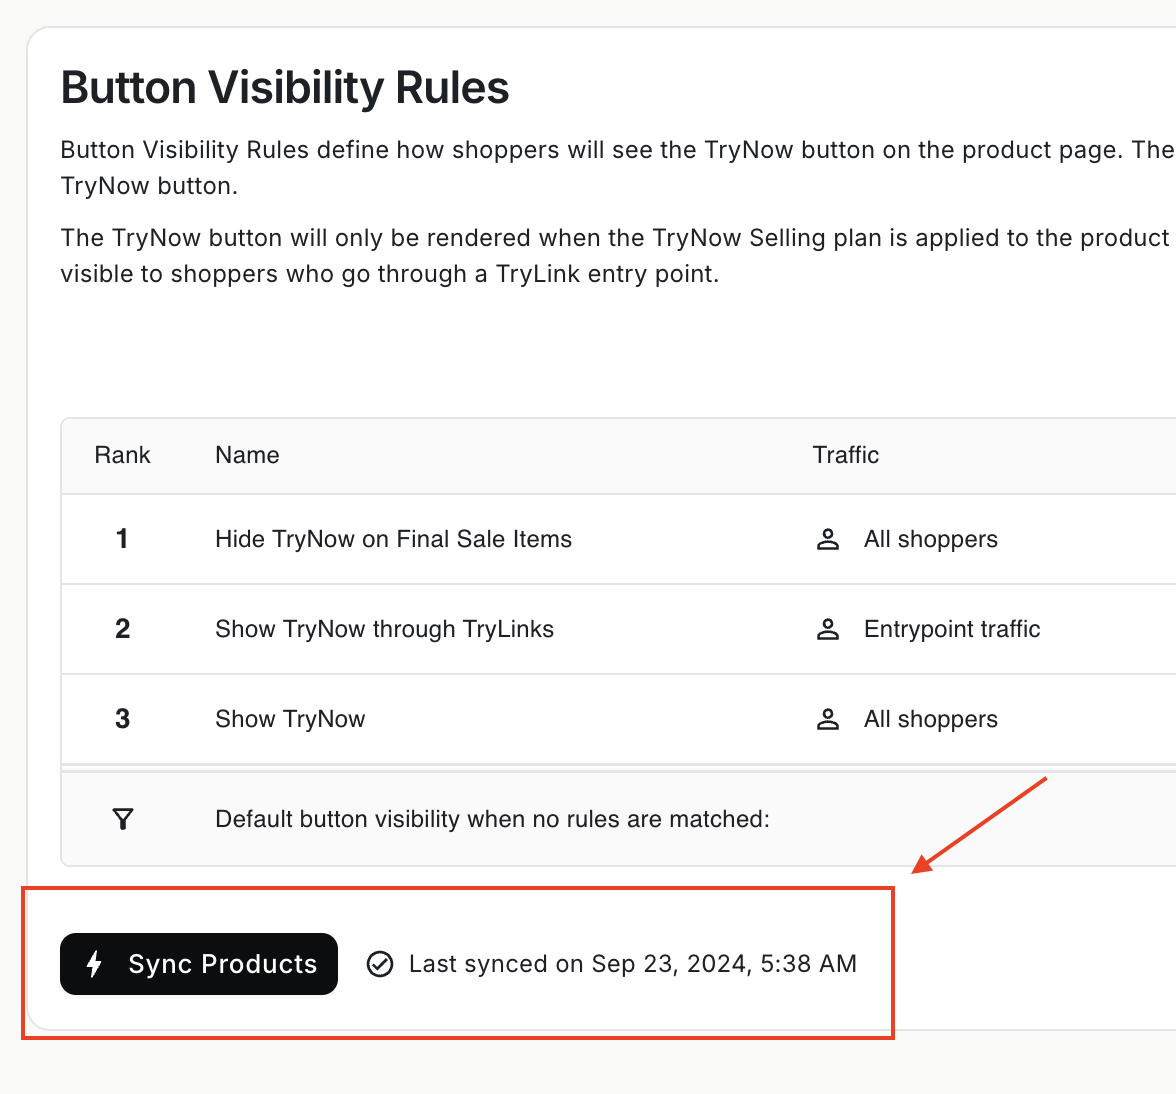
In order to fully automate your TryNow collection, navigate to Merchant Portal > Controls > Button Visibility Rules and confirm your rules are configured. When rules are configured, click the Sync Products button.
The visibility rules tab will notify you when rules were last synced. If you have not synced your products yet, you can get started simply by clicking Sync Products.

Navigate to your products page and search for products tagged with TryNowAutomated to confirm the sync occurred properly. Keep in mind this may take some time.
After the sync is complete, TryNow will automatically handle adding tags to new products or when rules change.
Create your automated collection in Shopify based on the TryNowAutomated tag.
Liquid (manual)
TryNow exposes some methods on a window.trynow object in order to allow for exclusion in collections that align with Button Visibility Rules configurations. The following steps will get you set up.
HintSee our recommendations for configuring your collection page in Shopify here.
1. Set up the basics
Ensure the TryNow selling plan purchase option is active on your products.
Create a new collection template as you would for any new collection within the Shopify Code Editor. Here you can determine your naming for TryNow collection pages, define product loops, and create templates.
2. Ensure TryNow is enabled on your theme
For more information on configuring TryNow to your theme, check out our self-service documentation here.
3. Create a TryNow collection
While there are any number of ways to make a collection, we recommend using automated collections and including some shopper education to optimize the TryNow experience. See our step-by-step guide here.
Once the template is created, you can assign it to a collection of products in Shopify.
Heads up!The collection template must be created in the live theme code. It will not be visible until assigned a collection that's on an active sales channel.
4. Configure TryNow Rules
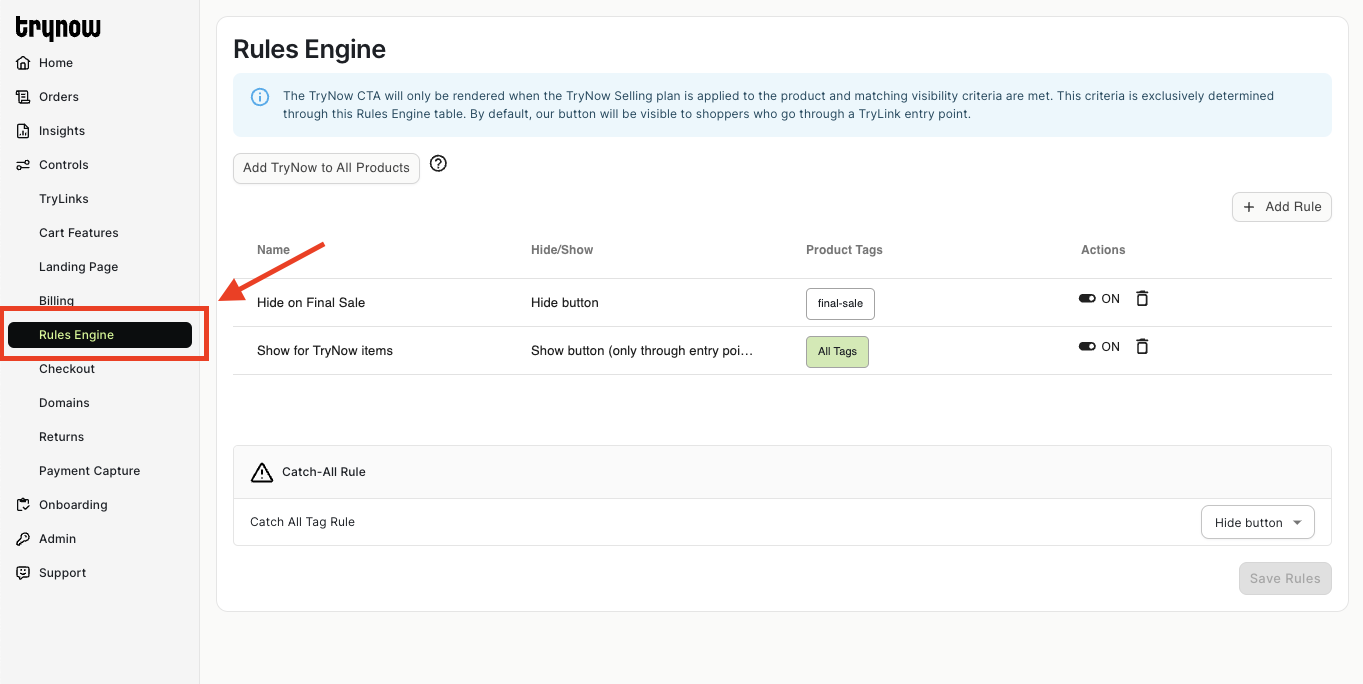
Some rules are created by default when TryNow is installed on your store. To configure rules, you must navigate to Merchant Portal:

Implementing Exclusion Criteria
Shopify does not support exclusion behavior when generating automated collections. In order to solve for that, we offer built-in TryNow product visibility logic which can be implemented in the Shopify Theme Code.
Product Loops
A product loop is a piece of code in which the list of products in the collection is being "looped" over so every product is rendered in the same way.
Given the below product loop:
{%- for product in collection.products -%}
  <li class="grid__item">
    {% render 'card-product',
      card_product: product,
      media_aspect_ratio: section.settings.image_ratio,
      show_secondary_image: section.settings.show_secondary_image,
      show_vendor: section.settings.show_vendor,
      show_rating: section.settings.show_rating,
      lazy_load: lazy_load,
      show_quick_add: section.settings.enable_quick_add,
      section_id: section.id
    %}
  </li>
{%- endfor -%}
You can pass along any string to the calculateProductVisibilityFromTags() method.
Heads up!While any string can be passed to
calculateProductVisibilityFromTags(), TryNow recommends using the tags as provided by Shopify on the Product to guarantee alignment with Button Visibility Rules.
For example,
One can pass the product.tags variable provided by Shopify to the method. This is dynamic and only requires that you add additional tags to Button Visibility Rules:
await window.trynow.product.calculateProductVisibilityFromTags({{ product.tags | json }})
// outputs true or false based on button visibility rules
Or manually (not recommended— this will not match configured rules automatically):
await window.trynow.product.calculateProductVisibilityFromTags(['finalsale', 'new arrivals'])
// outputs true or false based on button visibility rules
Caveats
Since Liquid is processed server-side and javascript is executed client-side, it is not possible to directly assign Javascript variables to Liquid variables. This is important in theme templating as Javascript needs to be injected separately.
To solve for this, we recommend adding a script within your Liquid TryNow collection file and manipulating the visibility after the DOM Content is loaded.
For example, in the created TryNow collection template file (ex: trynow-collection.liquid) one can add this code snippet:
  <!------ BEGIN TRYNOW ------->
  <script>
    window.addEventListener('DOMContentLoaded', async function(){
        const products = {{ collection.products | json }}
        products.forEach(async (product) => {
    			product.tags = product.tags.map(tag => tag.toLowerCase());
          const isVisible = await window.trynow.product.calculateProductVisibilityFromTags(product.tags) // Shopify provided tags
          if(!isVisible){
            document.getElementById(`product-${product.id}`).style.display = "none";
          }
        })
      })
  </script>
  <!------- END TRYNOW ------->
You may need to adjust the product card ID or class name to match the selector provided.*
Updated 3 months ago