Enabling Your Redo Integration

Redo Setup Guide

  1. In the TryNow Merchant Portal, expand the Controls section and select Returns.

Screenshot of the TryNow Merchant Portal interface with annotated navigation instructions. A red arrow labeled "1" points to the "Controls" section on the left-hand sidebar, indicating the first step is to expand it. A second red arrow labeled "2" highlights the "Returns" option nested under Controls. On the right side of the interface, the Returns settings page is shown. A third red arrow labeled "3" points to a right-aligned "Add Integration" button located above an empty table under the section titled "Returns Software Integrations." This screen sets up the context for initiating a Redo integration.


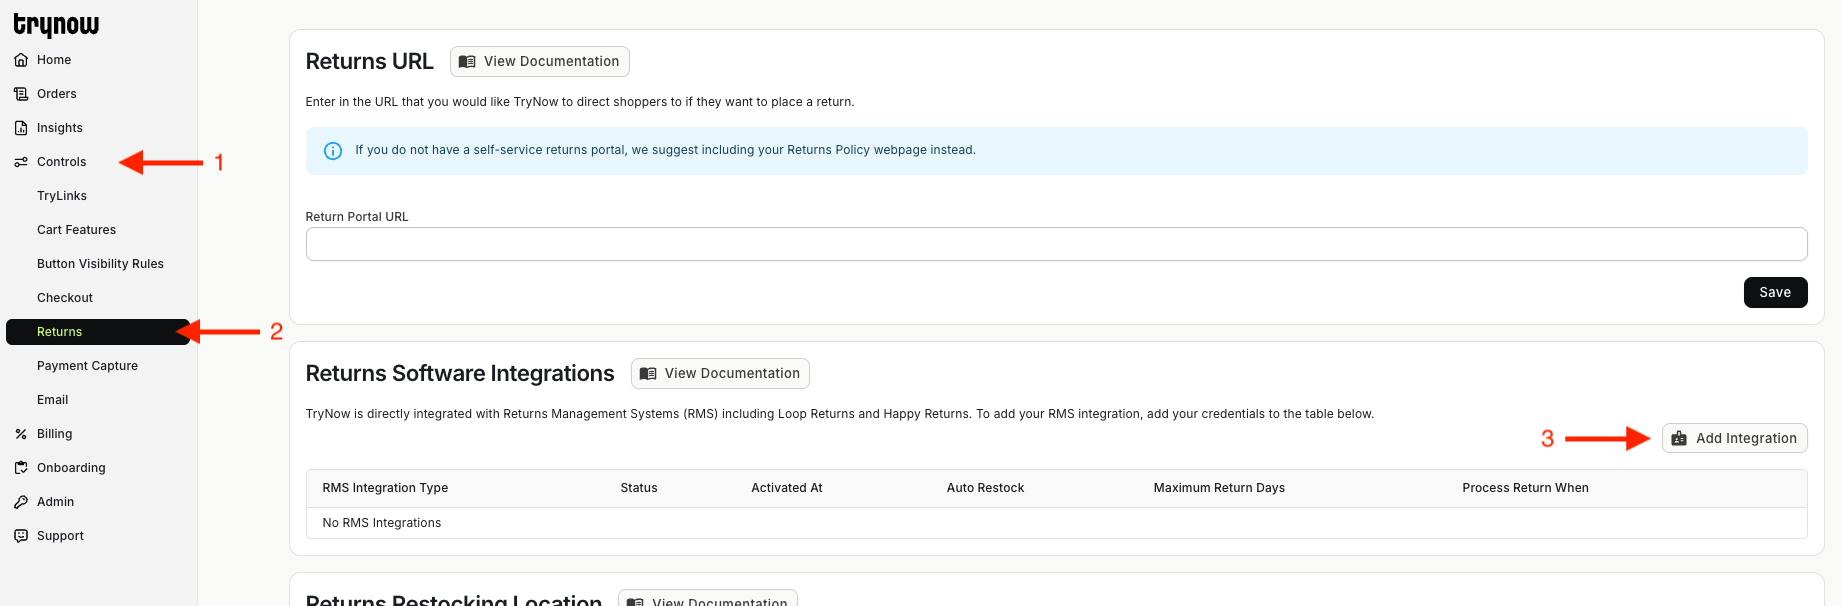
  1. Click the Add Integration button.
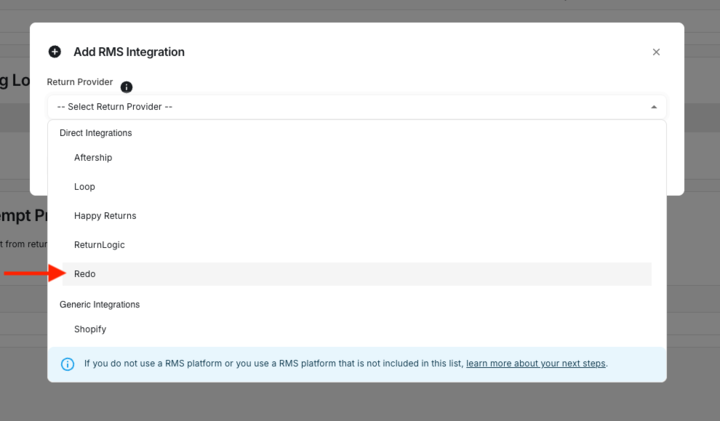
  2. From the Returns Provider dropdown, select Redo.
  3. Configure your desired settings, such as Restocking and Return Window Processing.

Screenshot of the "Add RMS Integration" modal overlay in the TryNow Merchant Portal. The modal includes a dropdown labeled "Returns Provider" that is expanded to show two groups: "Direct Integrations" and "Generic Integrations." Under "Direct Integrations," options such as AfterShip, Loop, and Happy Returns are listed. A red arrow points to "Redo," highlighting it as the correct selection. "Shopify" appears as the only option under "Generic Integrations." This interface allows users to choose their returns management provider.


  1. Within the modal, two pieces of information will be generated for you:
  • Webhook URL
  • Bearer Token

❗️

Temporary access to this connection information

These values must be entered into Redo. However, they cannot be viewed again after this step. You can easily generate new credentials if needed, but doing so will invalidate the previous token. Either temporarily save this information somewhere safe before continuing, or open a new tab/window to complete the rest of the guide without losing access.

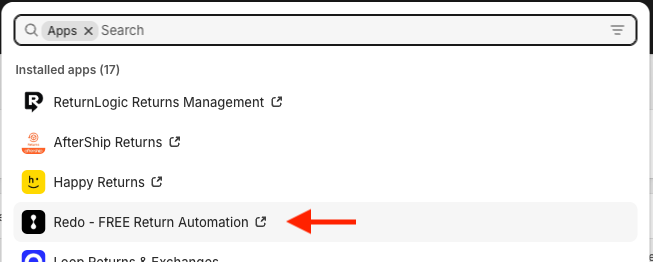
  1. Open the Redo – FREE Return Automation app in your Shopify admin. Use a new tab or window if you haven't yet saved the integration in TryNow.

Screenshot of a Shopify admin interface showing the "Apps" search panel. The user has searched for installed apps, revealing a list of apps including "ReturnLogic Returns Management," "AfterShip Returns," "Happy Returns," and "Redo – FREE Return Automation." A red arrow points to the "Redo – FREE Return Automation" app, highlighting it as the app of interest. This indicates the next step in the guide is to select or open the Redo app.

  1. In the lower left corner of the Redo app, click the Settings gear icon.

Screenshot of the Redo app's dashboard interface within a Shopify environment. The sidebar on the left features navigation icons including Home, Overview (highlighted), and Analytics. Near the bottom of the sidebar, a red arrow points to the gear icon with a tool tip labeling it "Settings," indicating where to click to access configuration options. On the main dashboard, a summary view is visible showing "Returns needing action", and a graph labeled "Total returns".


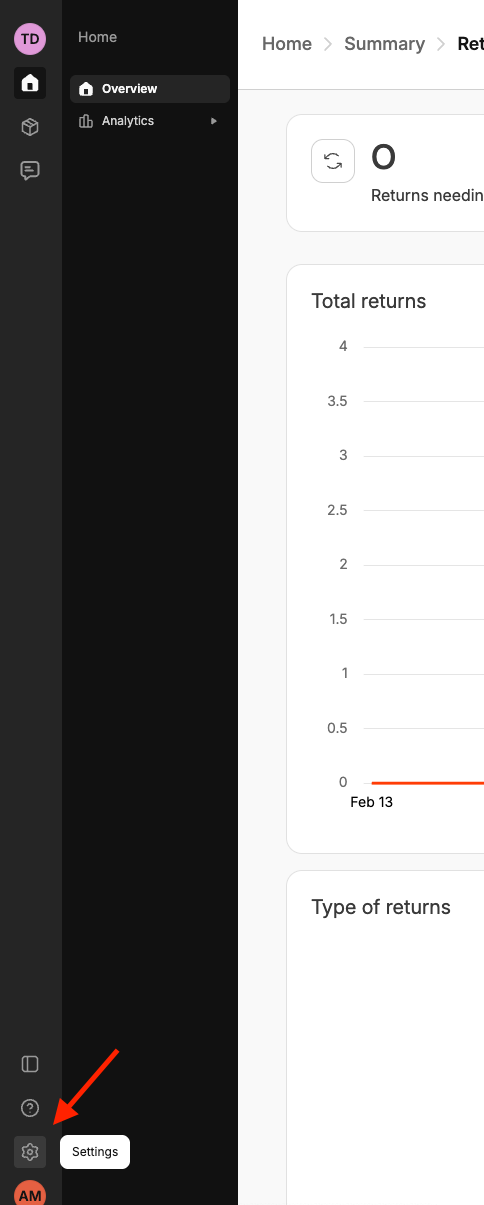
  1. In the left-hand settings navigation menu, select Developer.

Screenshot of the "Developer" section within the Settings page of the Redo returns management app. The left-hand navigation panel highlights "Developer" under General settings (marked with red arrow 1). On the right, the "Webhooks" configuration panel is visible, showing two existing webhook entries labeled "TryNow" and "TryNow 2." Each entry includes information for the reference name, topic (Returns), kind (Redo), a webhook URL, and a masked bearer token. A red arrow labeled "2" points to a black "Add webhook" button beneath the list, indicating where users can click to create a new webhook configuration. This interface is used by developers to integrate and receive return-related webhook events from Redo


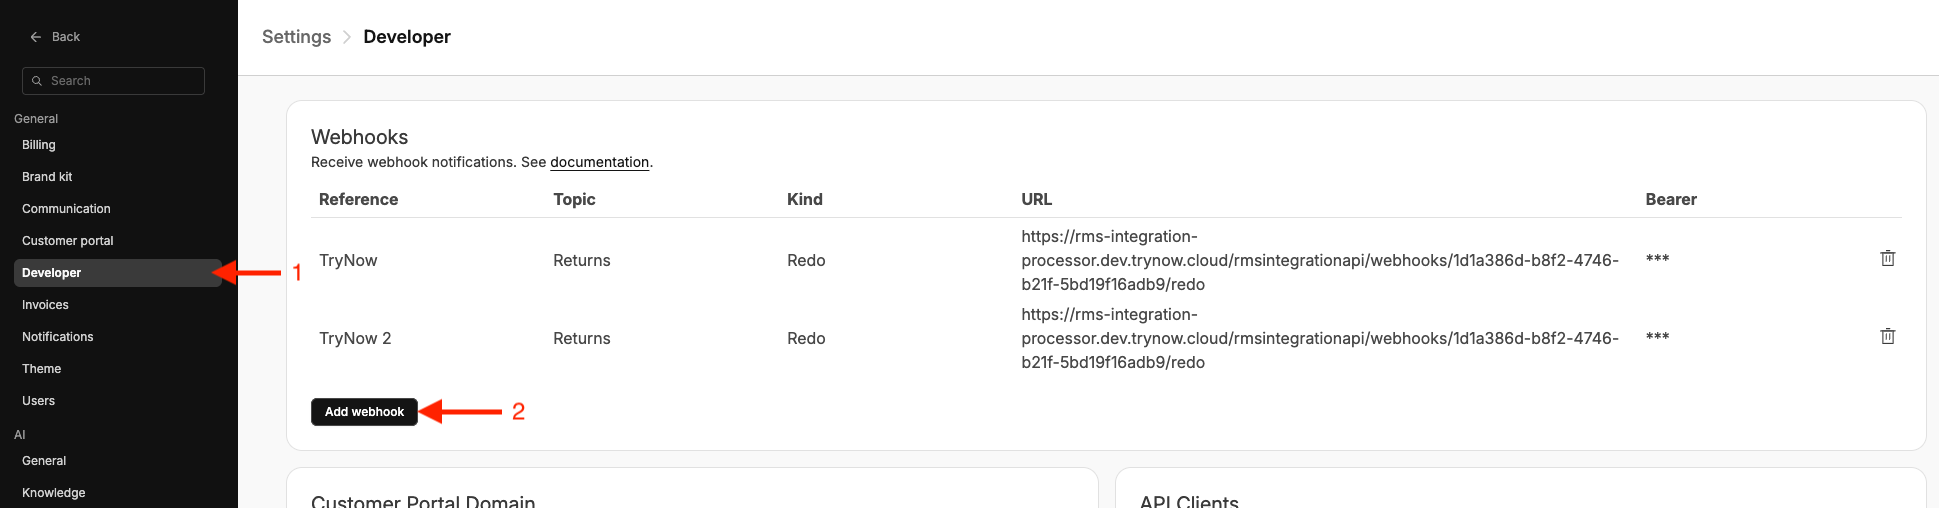
  1. Click the Add webhook button, then fill in the following fields:
  • Reference: Optional. Use a name to identify the purpose of this webhook connection (e.g., TryNow Integration).
  • Topic: Set this to Returns to ensure the correct data is sent to TryNow.
  • Webhook Kind: Set this to Redo to match the expected data format.
  • Webhook URL: Paste the Webhook URL you generated earlier in the TryNow Merchant Portal.
  • Bearer Token: Paste the Bearer Token from the same TryNow modal.

Side-by-side view of two modal windows: one from the TryNow Merchant Portal and one from the Redo app. Both modals are used to configure webhook integration. A red arrow connects the "Webhook URL" field in the TryNow modal to the corresponding "Webhook URL" field in the Redo modal. Another red arrow connects the "Bearer Token" fields between the two modals. These arrows illustrate where to copy the values between the systems. At the bottom of each modal, a black button is visible — "Save" in the TryNow modal and "Create" in the Redo modal — indicating the final step in saving the integration on both sides.

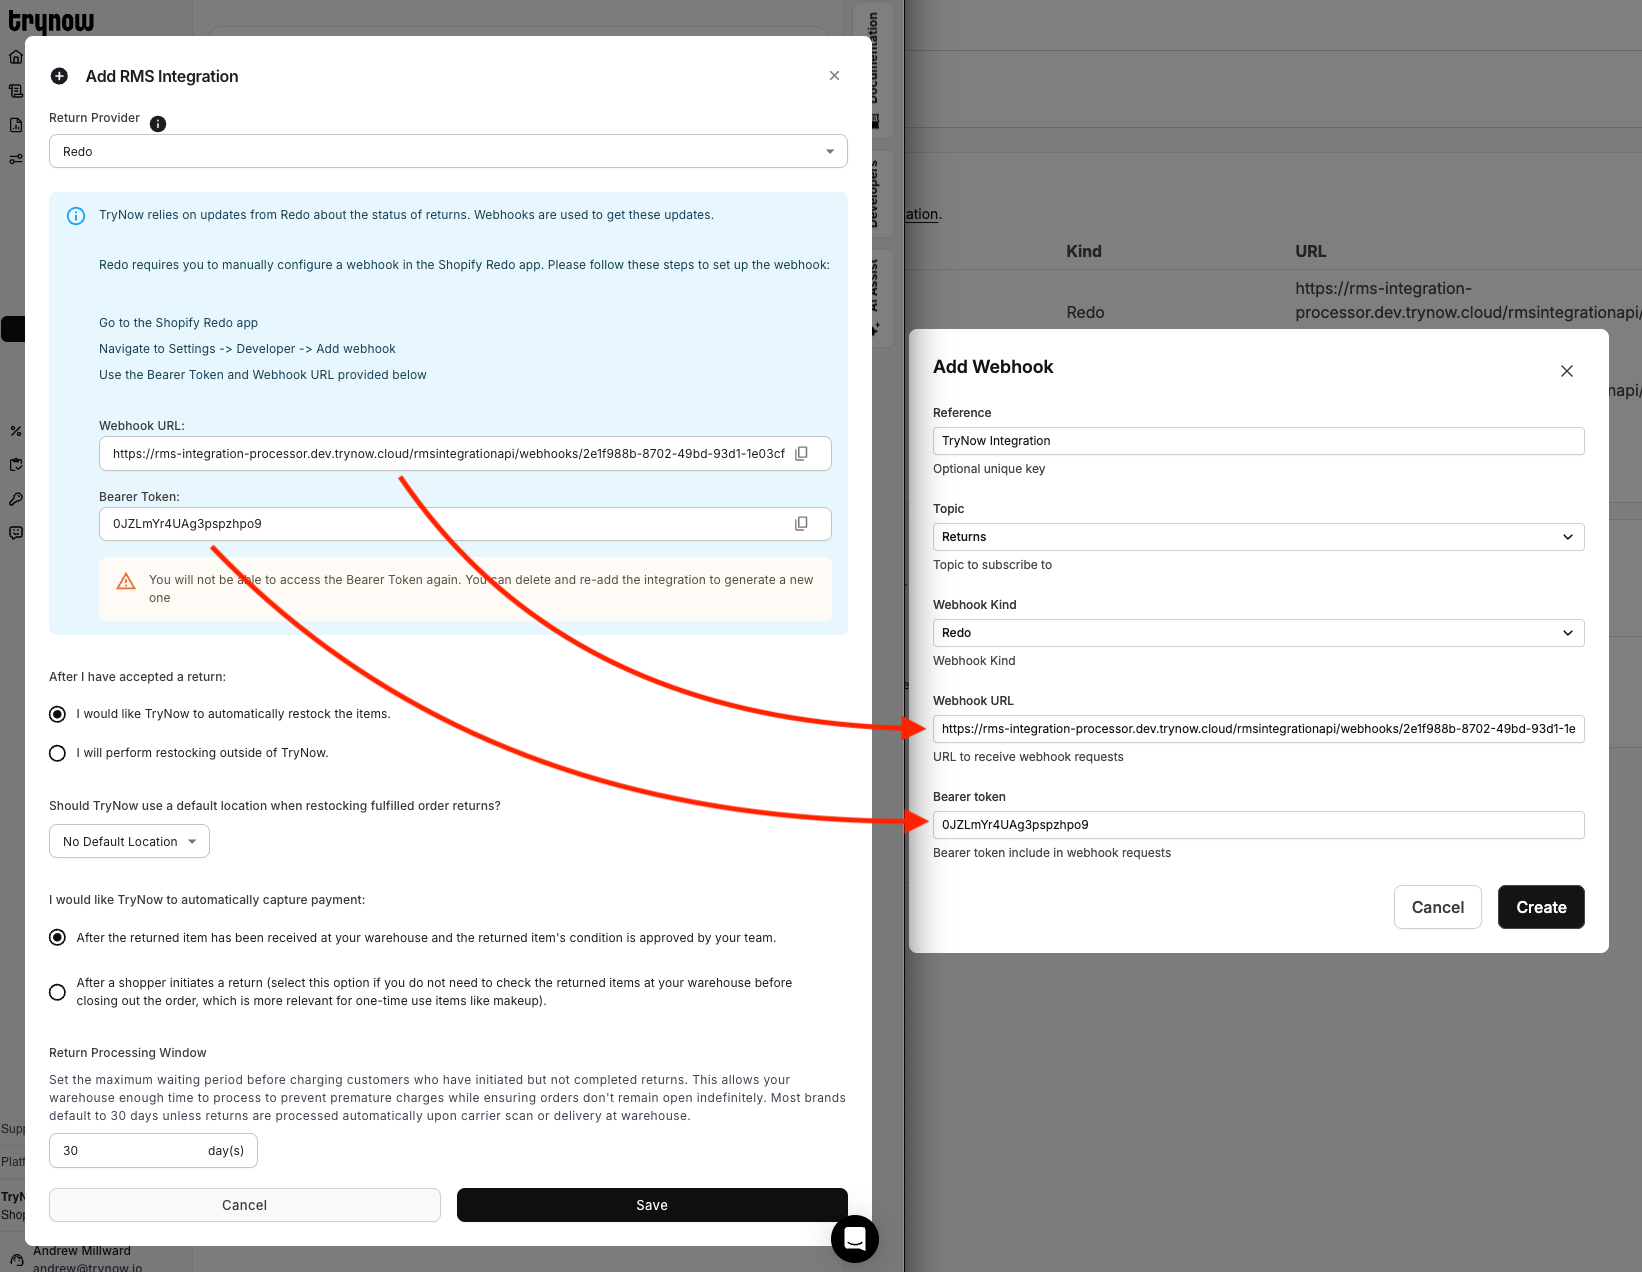
  1. Click Create in Redo, and if you haven't already, click Save in the TryNow Merchant Portal to finalize the integration.
  2. Delete any temporarily copied credentials, such as the Bearer Token, for security reasons.

Your integrations should be properly configured and you can expect to start seeing updates from Redo within TryNow's Merchant Portal on relevant orders.